

It’s Indeed Possible to Master Your Altissimo – And Here’s How
 If you’re someone that has been tinkering and experimenting with the altissimo range of your saxophone, then good for you. It’s something we can all use as an important tool for increasing our expressive abilities when playing the sax. If your attempts have been a bit frustrating then I have good news for you… you can do it!
Unfortunately, it’s not as simple as buying a few books or scouring the internet for that one magical fingering chart. This can get silly and frustrate you even further because looking at a fingering chart and attempting 4 or 5 or 8 different positions for a high G is not the way to do this.
The new JodyJazz DV HR Tenor uses the patented DV secondary window to add mid and low harmonics, resulting in a more authoritative tone than normal tenor sax mouthpieces provide. And the long straight somewhat high baffle gives the mouthpiece it’s fantastic projection and cutting power along with excellent altissimo.

JODYJAZZ.COM
The New DV HR Tenor from JodyJazz

A long time ago, 1941 to be exact, Sigurd Rascher, one of the most respected legit saxophonist of his day, wrote a book called “Top Tones for the Saxophone“. The book is over 20 pages long with only half a page devoted to a fingering chart. It lays out a set of fingerings from F# going up another octave and a half to C. People call these “alternate” or “fake” fingerings because they are made up and were not part of Adolph Sax’s invention.
Personally, I think too much is made about every type and make of sax and saxophonist needing a bunch of different fingering positions to successfully hit these high notes.
I, just as Rascher claims, have played the same fingering positions on at least 10 of some of the most common and popular saxophones (alto and tenor) and had no problems whatsoever in hitting these notes with full control. Some horns will require an additional side key or 2 to improve the intonation as you will see below.
Once you master this altissimo range you’ll soon discover that many notes can be successfully played with the same fingering and notes can also be played using several different finger positions. This is because the saxophone works within a scientific law we call overtones or natural harmonics. You can actually play it like a bugle, meaning you can play a series of notes using just one fingering position. This is what we do when playing overtones. This is also the most important technical thing you will need to master in order to control the altissimo notes. Those that don’t spend the necessary time on this and go looking for short cuts may be the ones searching constantly for a bigger and more fingering charts.
Here is a guaranteed plan that you can do to master the altissimo range. This is a brief outline of my full course which is made up of 4 parts:
Part One – Solid Foundation
What does this mean? You need to be able to play all the notes of the horn’s entire range with full control using extreme volumes from very soft to very loud. This ensures proper air support from the diaphragm.
- Play the entire normal range (chromatically) with smooth fingering
- Long sustained notes at different volumes (ppp-fff)
- Ear training – you will sometimes need to “hear” the high note first
Ear training for altissimo studies?
Yes because when playing overtone exercises it will be hit and miss, so hearing the note first will make it easier, even more so later on when trying out the alternate fingerings.
Simple but helpful ear training exercises for the more important and common intervals can be fun and easy. You can probably hum or sing a perfect octave. If not, use the first 2 notes to the song “Over the Rainbow”, you know, from the Wizard of Oz – “Somewhere over the rainbow…”
Can you sing a perfect 4th? Sure, just sing the “Wedding March” song – “Here comes the bride…”
How about a perfect 5th? “Twinkle twinkle little star…”
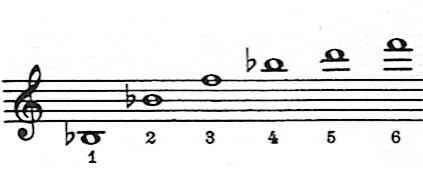
If you look at the natural overtone series of the saxophone diagram below you’ll notice that the first 3 intervals are the ones just mentioned; an octave, an 5th and a 4th. Hearing these in your head BEFORE you play will help you get it and you’ll also know if the note you did get is the right one.
Part Two – Overtones
Once the solid foundation is laid, it’s time to start working on the overtone series. Some of you may be doing this already. If not, start with the low Bb fingering but play a middle Bb note. Go back and forth between these two notes, always keeping the low Bb fingering. If or when you can’t get two separate notes open your throat, adjust your embouchure, change something to make it happen. Every time you get it, remember what you did differently from the times you didn’t get it. The next note of the series is a middle Bb. Then a middle F, high Bb, D, F.
Now actually play the 1st Low Bb overtones exercise:
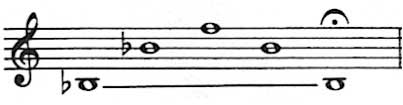
With this exercise you are playing the first 2 overtones; middle Bb and F. But don’t stop there, also do the same thing on the low B, C and C#. It will start to get a little more difficult after that but go as high as you can.
The more of these overtone exercises you do the better you are going to prepare yourself for taking control of the altissimo range.
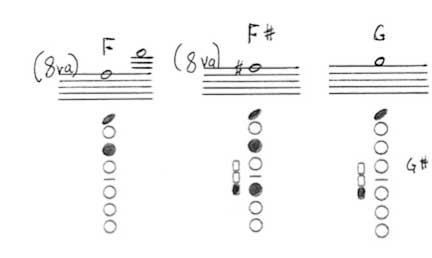
Nailing That Elusive High G
The first altissimo note most of us are going to go after is the high G. Although the F# is technically the first altissimo note, it’s a lot easier to get and most horns now will have an F# key anyways.
Don’t Use Your High F# Key!
Using the high F# key can be convenient and more in tune, but in an effort to get the high G you’d better forget about it. When it comes to getting the high G, the best way to approach it is off a forked F# fingering:
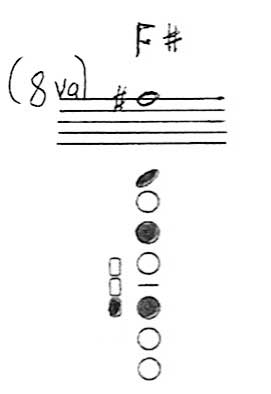
The side key is optional but usually helps for better intonation. Notice the basic finger position for the G below. After attaining a controlled F# with the forked position just release the other 3 fingers keeping only the top key pressed for the G.
Roll off the F# to G without a break (no breathe or tongue). It’s a quick and smooth move of releasing everything except the index finger of the left hand for that basic 3rd octave G. This is the exercise you need to do until you successfully hit that G with control. When this happens, stop to think about the little changes you did. This could be tongue placement, lip pressure, throat opening, oral cavity, and air support.
We’re all different, playing with different set ups and so these things will vary among each person.

When you get control of the G it may sound a little flat. Not to worry. The main thing is to get it first and worry about sharpening it up later. Here’s an additional fingering that can help you to achieve this:
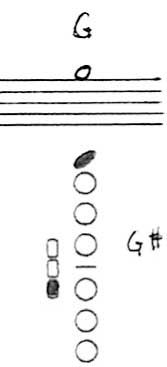 Try adding one or both of these additional fingers to see how sharp it makes the G. The first one is to play the G# key with your left pinky on the cluster. Then try adding the lower side key with your right index finger.
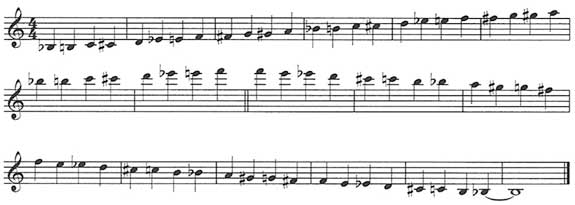
Here is the 3 note exercise to get that High G as smoothly as possible:
Make sure you spend time learning just the fingerings until smooth, then with a continuous breath and no tongue… blow!
*Important – if you scanned this article and just jumped into the fingerings at the end and were not able to play the notes, go back and work on the few exercises mentioned. As a saxophone player you must develop these few techniques in order to gain control of the altisimmo range.
http://howtoplaysaxophone.org/saxophone-music
May 1, 2015 @ 6:05 am
Thanks for yoour tips . I’ll be visiting it often to post comments on how I’m doing with the intonation and altissimo notes.
October 3, 2015 @ 1:25 pm
Hi Johnny,
Just dropping by to say thanks for creating this altissimo course, i had only been playing the sax for around 6 months when i started it. Within a couple of months i was managing to start to hit some of these elusive notes!
Anyone else out there – i can assure you Johnny’s course does work.
October 3, 2015 @ 3:03 pm
well that’s pretty good if you’ve only been playing a few months. the exercises in Part 1 will also help to improve your overall tone in general so keep up with those daily if you can.
cheers
Johnny
April 9, 2016 @ 1:12 pm
Hi Johnny, very informative website. I was wondering how you felt about using alternate fingerings and overtones in order to bypass playing the left hand palm keys, which on my sax, a 1937 Martin Lion&Crown tenor, are very difficult to play cleanly and precisely.
Here’s what I do: If I play G I can produce highD
If I play Ab I can produce high D#
If I play A I can produce high E
Bb will produce high F
B will produce high F#. I tried getting high G by playing C but I havn’t been able to do that yet. I was just wondering if you have ever tried using this method?
April 9, 2016 @ 6:24 pm
no I haven’t. when dealing with that register it’s possible to play just about any note with variations because we’re dealing with overtones but to ensure pitch it’s best to go with the more proven ones. I lay out 2 for every note. just in case someone has an easier time with one of them. I rarely play those notes using a different fingering.
August 29, 2016 @ 10:18 am
Its all dependant on the horn. I’m getting by for now on a Rumanian Arta Guban. G3 just pops out time after time. I’ve had Conn’s, Kings, Selmers on which I have had to really struggle. Nothing worse than hitting G3…and zilch. Doesn’t look good.
August 29, 2016 @ 10:20 am
Johnny is da man !!
September 19, 2018 @ 4:16 pm
Thanks for making my reentry to saxophone heaven stronger and simplified
January 13, 2020 @ 4:41 pm
Send me a copy of your altissimo alto saxophone fingerings. Some books I’ve looked at are very odd. My bundy II alto saxophone doesn’t have a high F sharp key on it. I know that I’ll have to play alternate high F sharp.
January 3, 2021 @ 8:14 pm
Nice explanation for the fingering, and good to see the relation between Rascher’s book and playing altissimo. Thank you!