

The A.L.E Reed Balancer. Does it Work?
Introduction
With musicians continued frustration around the consistency of cane reeds from brand to brand, there have been more reed tools hitting the market designed to help address this common issue. In the past, I had tried sand paper, reed rush, and a reed knife to try and correct various reeds that either played too hard or were not sealing well with my mouthpiece. Recently, I was contacted by Marti Giaimo regarding his A.L.E Reed Balancer tool. I will be providing a product overview as well as my overall thoughts.
Here's a new alternative to the uninspiring tunes often found in the average beginning sax book. This collection of 25 tunes, each with backing and demonstration tracks plus a video tutorial, is the product one of my most significant discoveries in over two decades of working with beginning saxophonists. That is, beginners learn fundamentals much faster by playing the kind of music that attracted them to the horn in the first place.

INFINITEMUSICAN.COM
🎷 Sax Fundamentals Faster

Product Overview
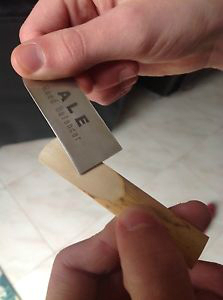
The A.L.E. reed balancer is a small and lightweight piece of steel with a slight rough edge at the tip which can be used to improve the performance and play-ability of natural woodwind reeds. The reed balancer is easy to transport, safe, and designed for beginners, intermediate, and professional players. Each reed balancer comes with a lifetime guarantee on materials and workmanship and can be used on single and double reeds. I have included directions on how to use this tool as well as the link to a video demonstration by Marti Giaimo below.
Directions
“Place the Reed Balancer at a 45 degree angle. Resurface the back of the reed (clarinet or saxophone), by starting at the heel of the reed. Drag the Reed Balancer across the reed, in the direction of the grain, usually, two or three passes is sufficient to flatten the back of the reed so it will “sit” properly on the bed of the mouthpiece. Play the reed. If one of the rails of the reed doesn’t “speak” as freely as the other, take the Reed Balancer and drag it across the intended corner edge as follows. If it is the right trail, drag the Reed Balancer once or twice, in a North-Easterly direction, avoiding the “heart” (center) of the reed. If it is the left rail drag the Reed Balancer in a North-Westerly direction, once or twice, avoiding the “heart” (center) of the reed.”
A.L.E Reed Balancer Demonstration Video
http://www.youtube.com/watch?v=3MH1pGBl8-A
Overall Thoughts
I have been using the original ReedGeek Classic tool to work on all of my reeds and decided to compare it to the A.L.E Reed Balancer as a point of reference. The A.L.E Reed Balancer is a very simple and lightweight tool which I used to flatten the back of my reed so it sat flat on the table and sealed with my mouthpiece. I found this tool is most effective by the recommended 45 degree angle when removing cane from the top and bottom of the reed. In comparison to my ReedGeek Classic, the A.L.E Reed Balancer was best used to remove some cane off the back and front of the reed. When it came to focusing on the left and right corner of the reed so to not effect the heart, The ReedGeek Classic had various features built into the tool which made it easier to use. In my opinion, I see the A.L.E. Reed Balancer as a great tool for students who want to begin working on their reeds and simply flatten the bottom and take some cane off the top. The A.L.E Reed Balancer would also work for intermediate and professional musicians but I believe the ReedGeek Classic allows you to balance the reed even further from multiple angles without taking too much cane off the reed. Overall, the A.L.E. reed balancer does remove cane off the reed easily and is especially safe to use. I believe with any of these tools, becoming educated on the various ways to remove cane and practicing with the tool will best help you understand what steps you need to take to make your reeds play better. I would like to thank Marti Giaimo for allowing me to test out his A.L.E. Reed Balancer tool.
What tool or routine do you use to best improve your reeds?
September 6, 2016 @ 7:07 pm
Hello Zach
Thank you for the review on The ALE Reed Balancer. I do believe you missed the point comparing it to any other type of Reed tools. All other Reed tools are sharp and can damage the Reed as well as cut the fingers of the user. Not once did you state this in your review. I would appreciate it if you changed your review and kept it on track to the product your reviewing. If your reviewing all Reed tools then you must state the pros and cons for all tools. Like cutting your fingers when holding a tool like the Reed geek. Again I thank you and hope to see a change in your review ASAP. Dominic Bianco CEO ALE
September 8, 2016 @ 8:04 pm
Hello Dominic,
I used the ReedGeek as a point of reference because that is my main tool for working on reeds. To your point about safety, I did mention the A.L.E. is a safe tool (which it is). I was not reviewing all reed tools but just mentioning a few I used in the past. In regards to cutting my fingers or damaging the reed, I have never experienced this while using the reedgeek and have not run into any players to this point who have had that experience. I would say with sandpaper you can run into damaging or destroying the reed if your not careful and the reed knife you can potentially cut yourself.
Call me if you have any additional questions.
Thanks,
Zach
September 9, 2016 @ 5:48 am
I don’t think you you could cut yourself with a ReedGeek if you tried.
September 10, 2016 @ 4:44 am
There was no before and after sound comparison of the reed, either on the clarinet or the tenor sax. For all we know, those reeds could have been “speaking” perfectly well before the tool was used on them.
I was also a bit dubious about the suggestion that the ReedGeek was potentially “dangerous”. Probably no more dangerous than the glass Vandoren reed stick, which I use all the time.
September 10, 2016 @ 2:17 pm
Hello Stephen,
If the reed played great from the start, I would not use the reed tool on it. In term’s of sound, sometimes a reed has a great overall sound but just feels stiff in various registers.I do agree with your comment regarding the reedgeek.
January 9, 2021 @ 9:08 am
I feel compelled to remark that I am old enough to remember the world of the clarinet almost sixty years ago when I first picked on up and started to play. I am shocked, after a 50 year hiatus, by the increible number of products and what I consider gimmickry ranging from “reed balancing” to supposedly “improved” bells and barrels. None of this was available or topical 50-60 years ago and the sound of the music was beautiful! The idea of “flattening” a reed in order to sit properly on the mp table is ridiculous. Any decent reed, costing at least 2.50 each should be flat as can be after being placed on virtually any mp I’ve ever seen or used and tightened by use of the ligature. The problems, which have always existed, have to do with the imprecise and inconsistent quality of the cane material used. The only new and hopeful concept that I’ve seen which may prove useful is the use of blended or plastic type reeds which will last and provide a consistent quality of sound.
Overall, though, I am dismayed that opportunism and greed has become so rampant in the arts and particularly, in the area of instrument accessory manufacture.
January 10, 2021 @ 4:30 am
Hello Al,
I recognize that there are products that do appear to be gimmicky or not well built but at the same time there have been products released over the past couple of years such as the GapCap, ReedGeek, Saxholder, and cases to name a few that do provide the musician a better option to choose from then there was in the past. I agree that many reeds should be flat and consistent but as you know that depends on the quality of the cane and since its quite rare to get 4/5 reeds that play great right out of the box, various reed tools can help.
Again, the great news is all of us as musicians or interested in playing as a hobby ultimately can make the choice whether we buy a product or not. From my experience playing quite a few products over the past couple of years, there are some products that are not great, ok and some that are great. If a product is great, I might buy it, if the product is not, I will simply pass.
The overall good news is there are more options to choose from then there were in the past and is quite easy to identify those products that are good and those products which are not for you.
If you have a specific question on a particular product let me know and happy to provide some further info that may help.