

A Guide to Finally Figuring Out Which Bb Fingering To Use
I would say we’re pretty lucky to play an instrument with one of the most basic and straightforward fingering systems of any wind instrument. Merci, Adolphe Sax!
Choices, Choices…
For most of the notes on our horn, there’s pretty much one fingering, and when there is an alternate fingering it tends to be a pretty esoteric one that’s saved for a rare trill or difficult passage.


However, when it comes to our Bb, we have four different fingerings for it, three of which are quite commonly used by players. In this article, I’ll go over each fingering and when it should and shouldn’t be used.
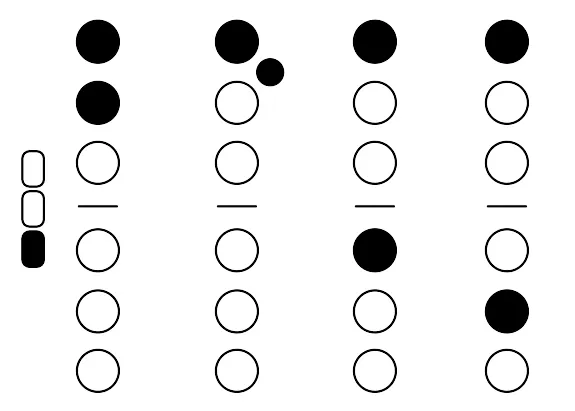
To begin with, for those of you who might not know these different fingerings, please see the fingering chart at the top of this article.
The Classic Bb
Let’s start with the side fingering for Bb. This is commonly the first fingering that’s taught to beginning saxophonists, and which, for many, is the primary fingering that they use. You’ll notice that fingering the note A in the left hand, the bottom side key on the right hand releases a pad when pressed, which raises the note a half-step up to Bb.
This is the best fingering for playing anything chromatic, since releasing the bis-key to go from B to Bb can be clumsy. It can also be used in playing most things that are in keys with flats, but you’ll find that when you get comfortable using the bis key that it can actually save you some fingerwork. However, of the four fingerings, the side fingering has the fewest limitations and is the best one to first get comfortable with.
Gettin’ Down to Bis
The next fingering is the bis fingering. You’ll see that the bis key is the little key that’s between the A and B keys on the left hand stack. You use the same finger you use to finger the B (your index finger, or what would actually be referred to as LH1 in most fingering charts, since it’s the top finger of the left hand).
You’ll notice that the mechanism is designed so that the bis key comes down when you finger everything from A below. This means that if you’re playing something in a flat key that stays relatively diatonic (meaning, in the key signature that it’s written in), you can have that top finger over the bis key and the B key anytime that it’s down. This saves you from ever having to use the side fingering for Bb.
However, you have to build the awareness of having that bis key down through practice – if a B natural comes up, you need to know to release it. The biggest limitation of the bis key fingering is that it’s not advisable for chromatic passages, or in other words, passages where you go directly from B to Bb. As stated above, using the bis key here is clumsy – although it can be done, it is needlessly awkward and should be avoided if possible.
Index Finger Twins
The next fingering is the 1+1 fingering. You’ll see that if you finger B with your left hand and bring the F key in the right hand down (hence the name for the fingering), the F key brings the bis key down with it, making the note a Bb.
This fingering, like the 1+2 fingering that we’ll go over next, is is much less commonly used than the first two fingerings, but is invaluable anytime you are going back and forth from F to Bb, or vice-versa. It makes this much easier to do. However, it’s not a useful fingering for anything chromatic and you wouldn’t want to use it in many other instances, since it creates what I call finger-switches, which is when one finger has to come up and another comes down at the same time. These are awkward and difficult to time properly, and thus we like to avoid them when we can.
The Wildcard
The 1+2 fingering involves using the second finger of the right hand, the finger that comes down to play the note E. This fingering is used when going back and forth from F# and A# (the other name for Bb), or Gb to Bb. Otherwise, like the 1+1 fingering, it creates similarly awkward finger switches and should be avoided.
The Moral of the Story
So the next time you practice your scales and arpeggios, think about trying some of these different fingerings and seeing which one works best. Do your best to get equally comfortable with the first two fingerings, since they are most common and often interchangeable. The Universal Method for Saxophone has some great pages of exercises that use each fingering.
I’ve put five musical examples below. See if you can go through them and figure out which fingering(s) might work for each. My suggestions are at the bottom.
Download the sheet music for the examples here.
- I would definitely either use the side Bb fingering or the bis key here. If you’re new to either one, practice this passage with both fingerings. If you do use the bis fingering, the bis key can be pressed anytime the B key is pressed through the entire passage. Definitely do not use 1+1 or 1+2 due to the finger switches that they create.
- Side Bb is best here, since this is chromatic. The sliding that you’ll have to do to use Bis here is awkward and might slow you down, so I would avoid it.
- This is a perfect example of use for the 1+1 fingering, since you are going back and forth between F and Bb. However, bis is also possible here. I wouldn’t use the side fingering here since it adds a lot of unnecessary work for your hands.
- 1+2 fingering is great here, or Bis key. Once again, wherever possible, practice with both.
- Once again, since this is chromatic, use the side Bb fingering here.
Learn with and Listen to Sam
Sam Sadigursky is currently offering online lessons through Skype and private lessons in NYC. He has given improvisation clinics across the U.S., is a regular guest professor at Hunter College, and currently performs internationally with Darcy James Argue’s Secret Society, Folklore Urbano, and others. His new book, 12 INTERVALLIC ETUDES for Saxophone, is available here. His albums can be purchased at http://samsadigursky.bandcamp.com. To find out more, visit SamSadigursky.com.
November 21, 2013 @ 8:05 am
Sam: I totally agree with your explanation as it relates to finger technique. But readers who are new to any of these fingerings may not realize that each fingering also has different pitch and tone characteristics. This can be a problem for saxophonists whose ears aren’t tuned in to it, but it can be an advantage for advanced players who know when to use a little sharper fingering, or a little more muted fingering, etc.
Also, for the sake of completeness, 1+3 also works, or any combination of L1 plus R1, R2 and/or R3, though I’m not aware of many practical uses, and again intonation and tone are affected. 1+12 could be useful for a fast E-to-B-flat tremolo.
January 20, 2017 @ 6:37 am
Hi, I am not a sax player, so I am a little confused about the bis key. You said: “You use the same finger you use to finger the B (your index finger, or what would actually be referred to as LH1 in most fingering charts, since it’s the top finger of the left hand).” I tried this and I can’t get a Bb unless I press down the B key with the index finger AND the bis key with the LH2 (Could you clear this up?
April 24, 2020 @ 5:42 pm
I see the last comment was left several years ago at this point, so the OP has probably already found an answer to the question.
But for anyone who might have the same question, to use the bis key you press down on both the B key and the bis key with the left index finger (LH1).
The Alto Saxophone: A Guide To Its History Uses And Characteristics – ScionAv
November 30, 2022 @ 5:33 am
[…] such as Sopranino, alto, baritone, and contrabass can be found in Eb. When playing C on a Bb saxophone, the Bb tone is heard, whereas when playing C on a tenor saxophone, the Bb tone is […]
December 10, 2022 @ 7:29 am
Another self ego stroker.. how sad!
Not everyone started at 8 years old….